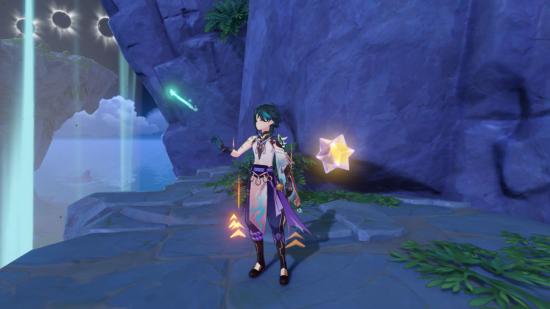
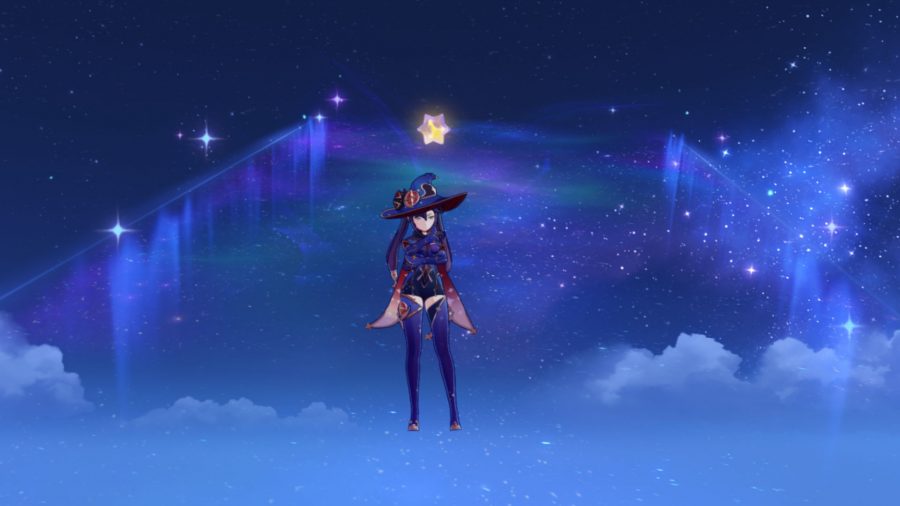
Genshin Impact’s Summertime Odyssey event transports you to a new version of the popular limited-time Golden Apple Archipelago map, and challenges you with a variety of domains and puzzles tailored around the featured characters. After completing Genshin Impact Mona’s stage and quest, you should be familiar with the beautiful prismatic Starlight Coalescence stars, but they don’t end when you pass through that teleporter and back onto the island.
That’s why we’ve charted out the stars to bring you this guide to all the Genshin Impact Starlight Coalescence locations and where to place them, so you can traverse the shifting terrain and solve the Genshin Impact Minacious Isle puzzle with ease. Of course, there are plenty of luxurious chests and a couple of freemos in it, too.
For even more Genshin goodies, check out our list of all new Genshin Impact codes. We’ve also got guides for all the current and upcoming Genshin Impact events, the next Genshin Impact banner, and the Genshin Impact update, as well as a handy Genshin Impact tier list to help you become the strongest fighter in Teyvat.
What are Genshin Impact Starlight Coalescences and the Minacious Isle puzzle?
Starlight Coalescences are items dotted around the Golden Apple Archipelago’s Minacious Isle. They’re required to activate a specific mechanism at the top of the tower ruins, which, in turn, unlocks astral pathways and grants you access to several luxurious chests. It takes three Starlight Coalescences to unlock the first astral path, and eight in total to get all of the rewards.
There are a whopping 18 Starlight Coalescences floating around, but, as mentioned above, you only need eight to access all the chests. We’re currently unsure what the others do, but we’ll be sure to let you know if we find any uses for them.
When you gather enough Starlight Coalescences, you can submit them to the monument at the top of the ruins, pictured above, and insert them to claim your rewards, in turn solving the Genshin Impact Minacious Isle puzzle.
All Genshin Impact Starlight Coalescence locations
Finding all of the Starlight Coalescences can be pretty tricky as Minacious Isle takes two different formations, and a lot of them require some running around and noggin’ scratching to reach. Below, we’ve listed all the locations and how to grab them based on each of the island’s formations.
To change the island’s formation, you simply need to find one of the water teleporters around the island (not the challenge one) and hit the ‘place in water’ prompt.
Minacious Isle formation one
This is the version of the isle you land on when you finish Mona’s domain. It has a large, ruinous tower above it.
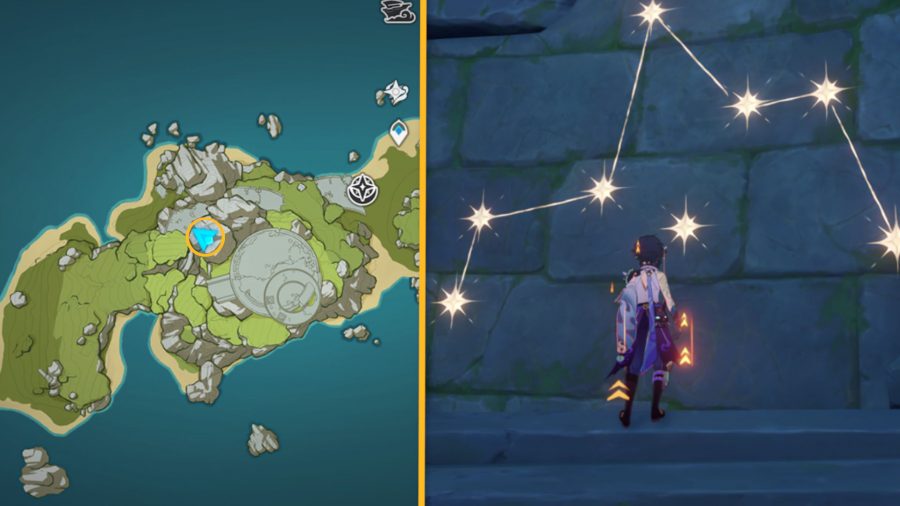
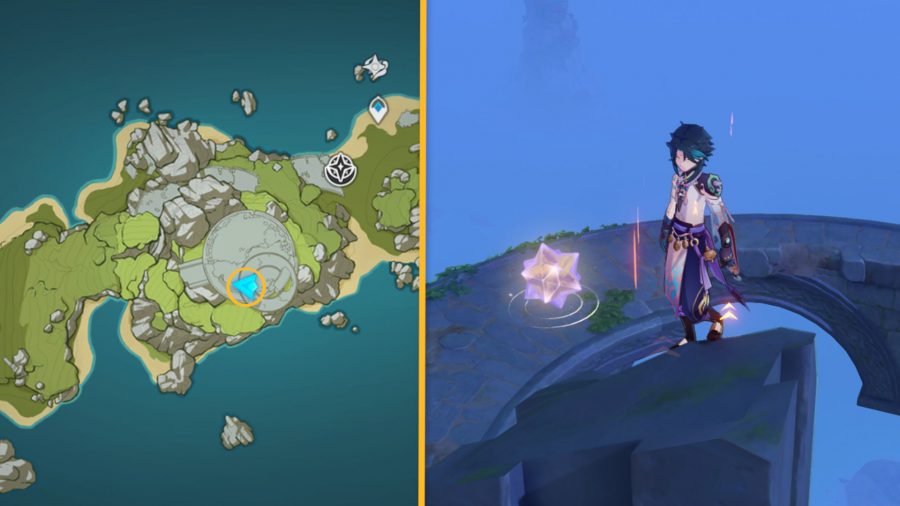
One – on the base level of Minacious Isle in the location noted above, there’s a set of constellations on the wall of some ruins, with one star disjointed from the rest. When you approach, a ‘touch’ prompt appears, which triggers a Starlight Coalescence to form. Simply follow it and grab it when it comes to a halt over the pressure plate
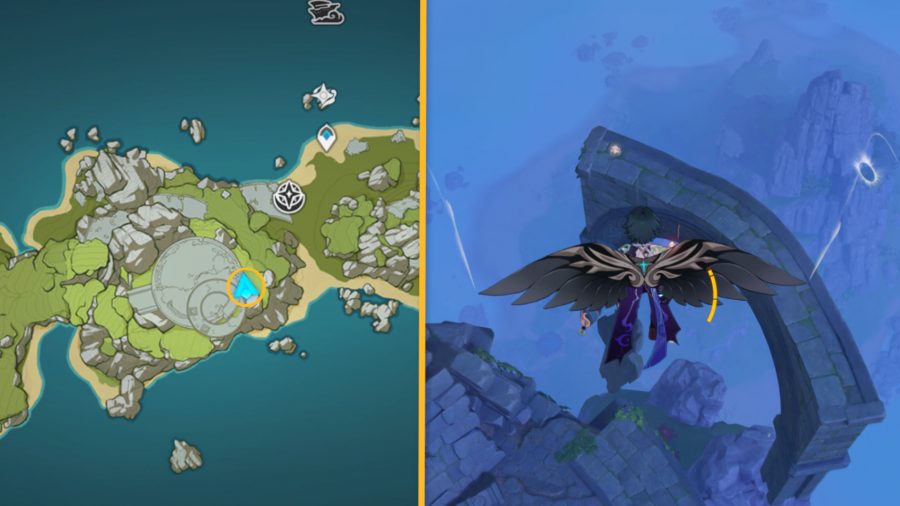
Two – at the top of the tower, you can see a large, broken bridge, as indicated on the map above. There are plenty of wind currents to help you get up there. When standing at the edge of the bridge, you can pan the camera to see a Starlight Coalescence located just below you. Drop down to find an invisible platform, from which you can easily snag that star
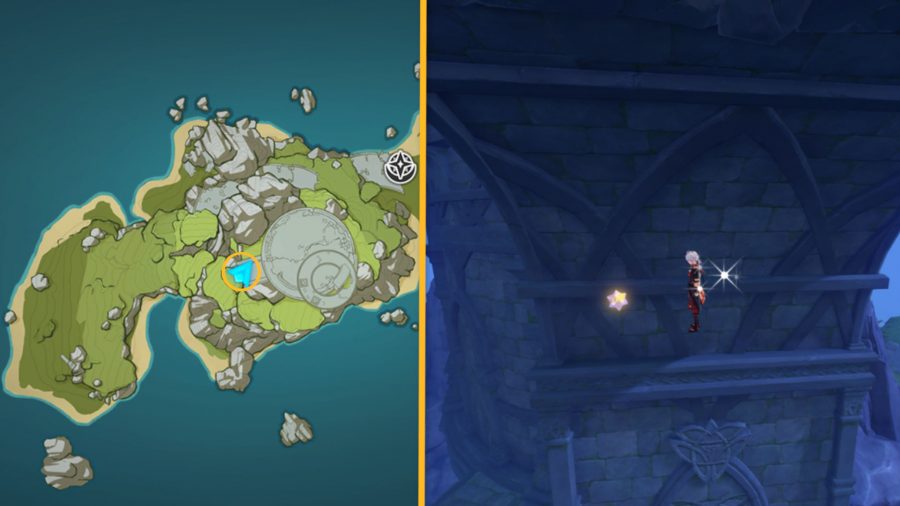
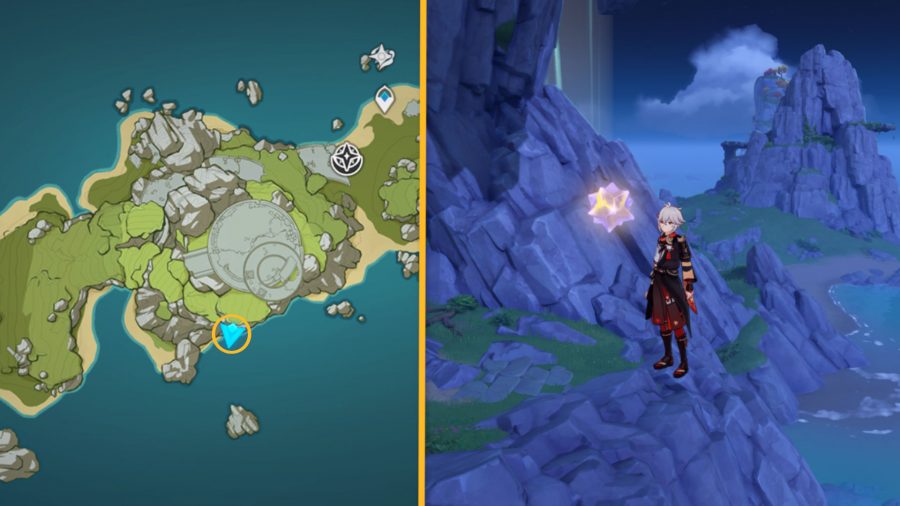
Three – head to the southern cliff highlighted in the picture above, then drop down. Below, there’s another Starlight Coalescence floating above an invisible platform, waiting to be captured
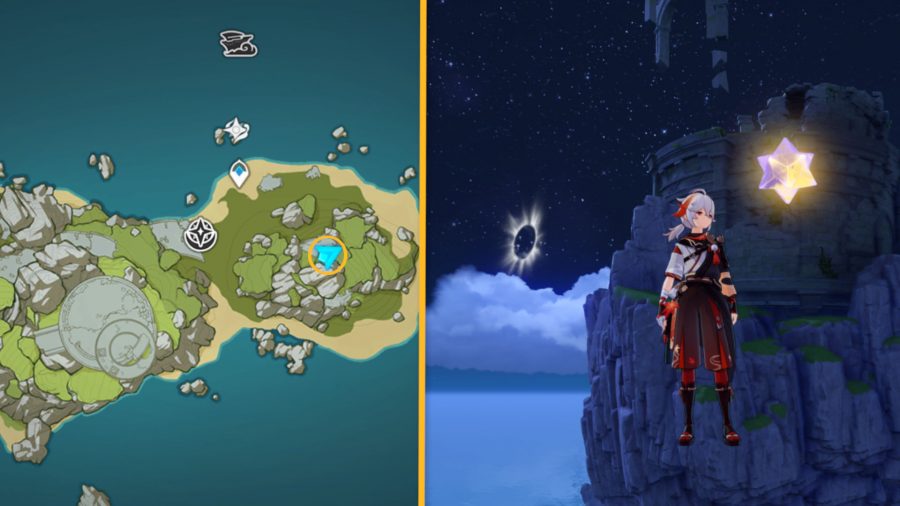
Four – there’s a Starlight Coalescence floating high above the cliffs to the right of the map. This one can be tricky to locate as it’s not visible from most parts of the island. However, the easiest way to track it is by finding the four-leaf clover mechanism below, activating it with an anemo character, then riding the resulting wind current through the vertical boost rings. From there, you can drop onto the invisible platform and grab the star
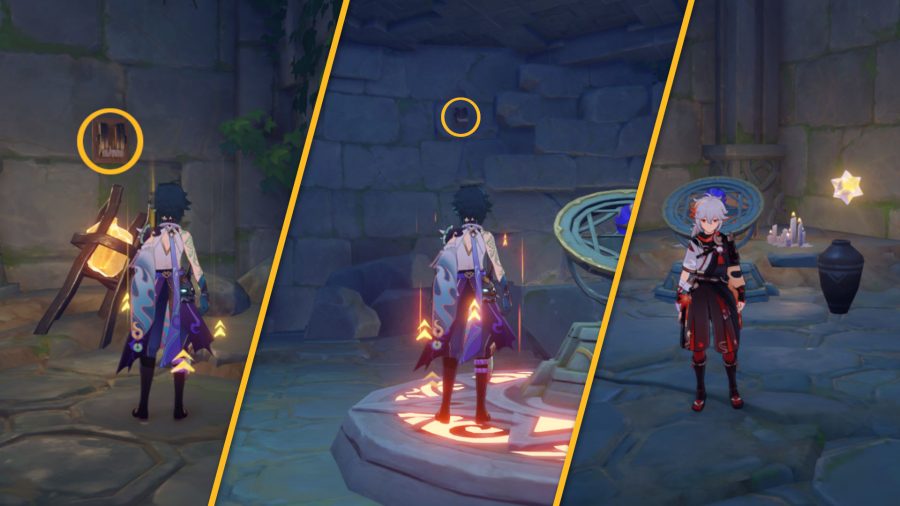
Five and six – there’s a few steps to snagging these two beauties, as they’re tied to time trials hidden within the ruins of the tower. Start by heading up the tower and entering through the southern archway. Inside, there’s a mechanism surrounded by torches, and two switches on the wall. One is by the entrance, the other is behind the mechanism. Flip both of them to open the gate in the ceiling, then climb through
Climb up further to get to the ledge above, and move through the hole in the wall. There, you can find another mechanism and a treasure chest, both locked with that tell-tale red sigil, along with two pots either side. You need to lead two nearby Starlight Coalescence to those pots. One is down the stairs to the left of the mechanism, the other is on a part of the nearby ledge that you used to climb through
Guide them both to the pots, and you unlock both the mechanism and the treasure chest. Then, simply approach both of the Starlight Coalescences floating over the pots and capture them
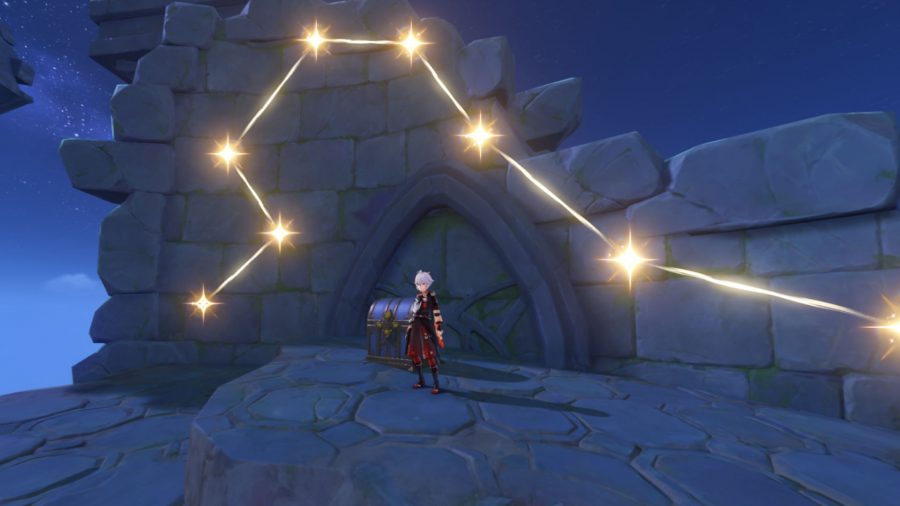
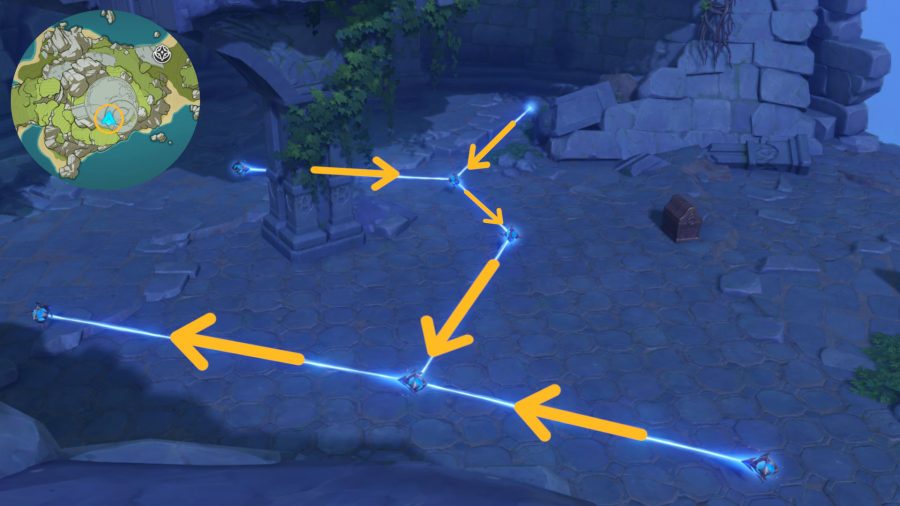
Seven – at the top of the tower in the centre of the island, there’s an astral puzzle. Solve the puzzle using the above formation to spawn a chest. Then, follow the Starlight Coalescence that pops out of the chest, which in turn guides you to the mechanism where you can place your Starlight Coalescences so far
Eight – placing three Starlight Coalescences in the mechanism near the top of the tower prompts an astral bridge to spawn. Hop onto the bridge and follow it up and around the ruins above the tower to find a luxurious chest. Climb the pillar to the left of the chest and you’ll find another Starlight Coalescence waiting to be snagged
Nine – there’s another Starlight Coalescence on top of one of the floating arches above the tower, just below the location where you found the previous Starlight Coalescence. You can see it from where the luxurious chest spawned at the top of the astral bridge. Simply hop through the middle of the circle where that chest spawned and glide over to it
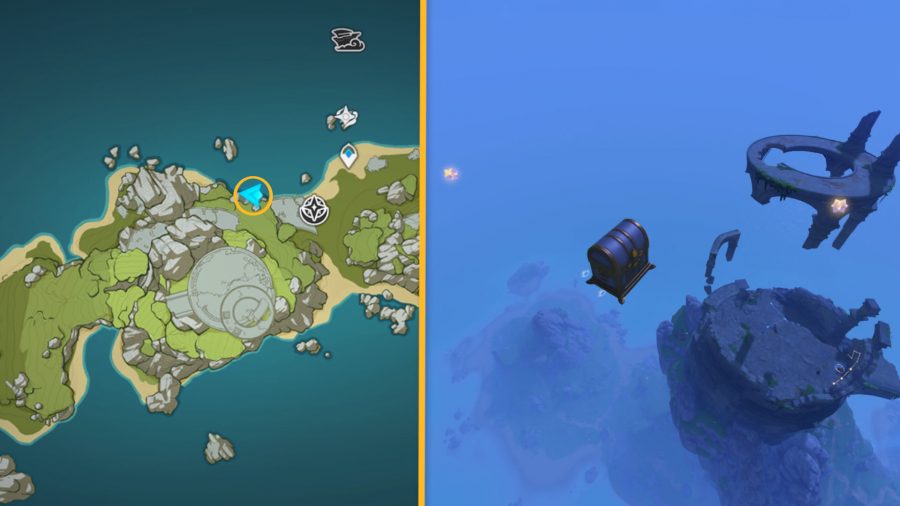
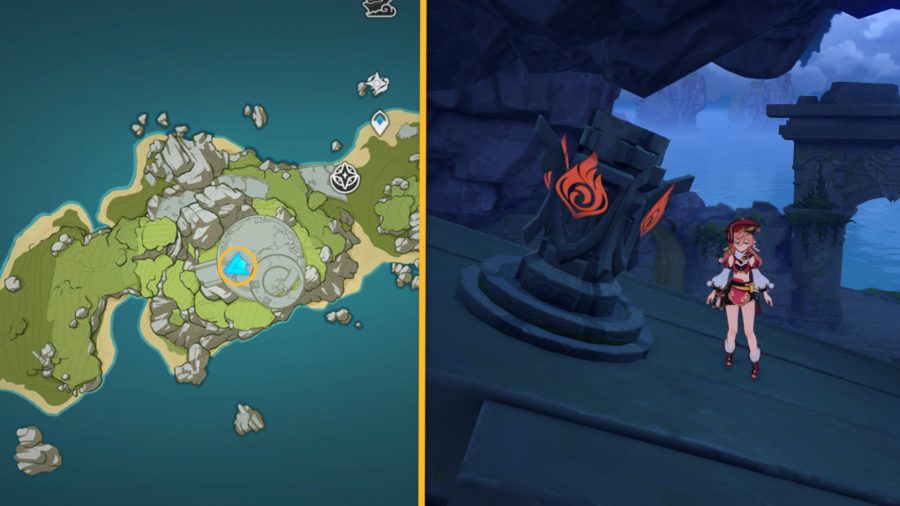
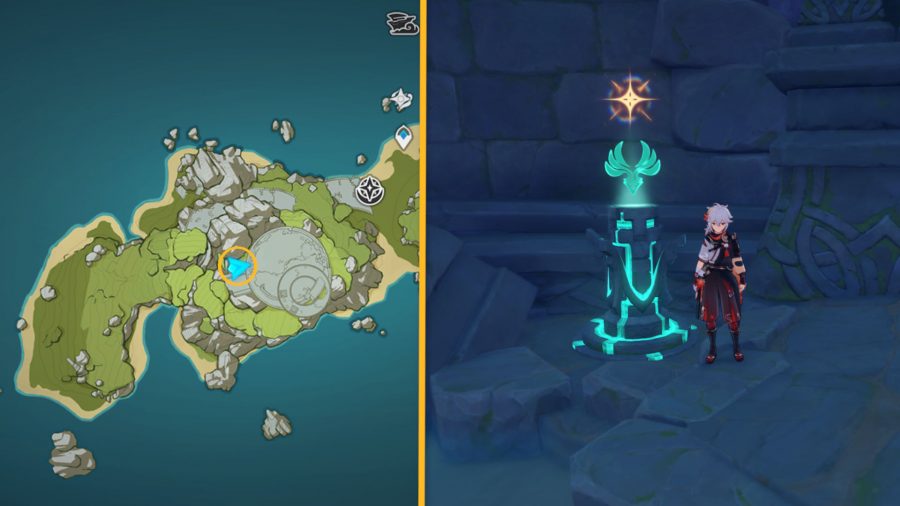
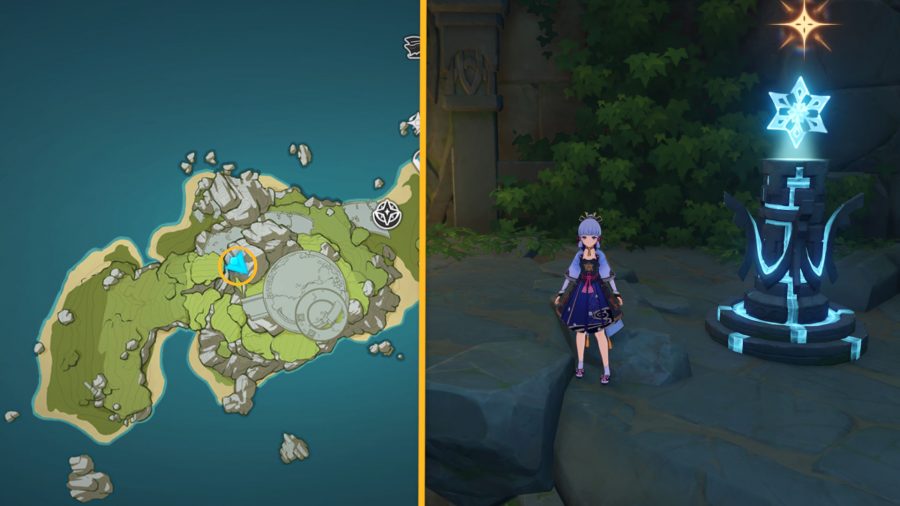
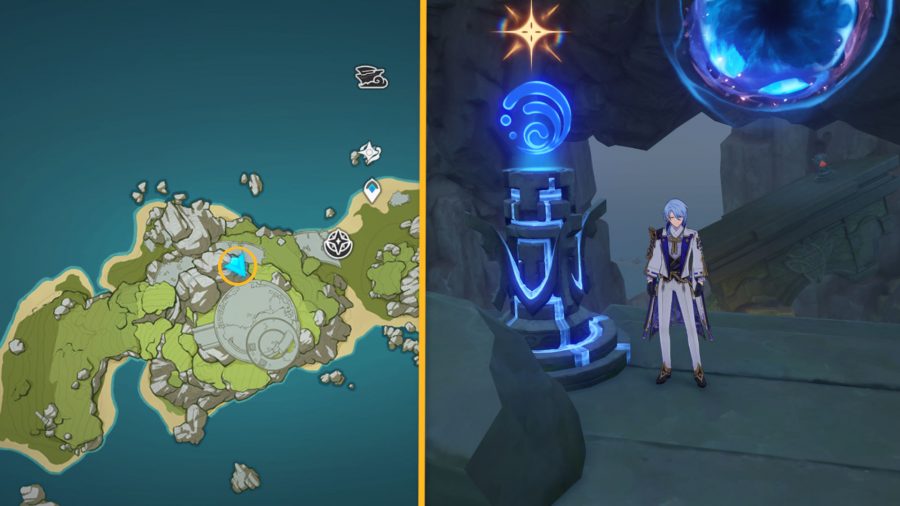
Ten, 11, and 12 – yep, this next one snags you three Starlight Coalescences. But, as you’ve likely guessed by this point, you’re going to have to do a bit of leg work to get them. These three Starlight Coalescences are floating around a luxurious chest in the air, but you need to complete yet another Minacious Isle puzzle by triggering four elemental totems in the correct order if you want to get up there. The order is pyro, anemo, cryo, hydro. Here’s where to find each of them
Pyro totem – on a slanted platform near the base of the tower
Anemo totem – hop down the hole at the middle of the base of the tower, beneath the star constellation where you found your first Starlight Coalescence
Cryo totem – just up the ramp and across the way from the anemo totem, next to the stone tablet
Hydro totem – on top of an archway near the entrance to the ruins, opposite the pyro totem
Activating the totems in this order opens a blue portal. Activate the anemo clover leaf mechanism below, then glide up to be transported to an invisible platform where the chest and all three Starlight Coalescences are located.
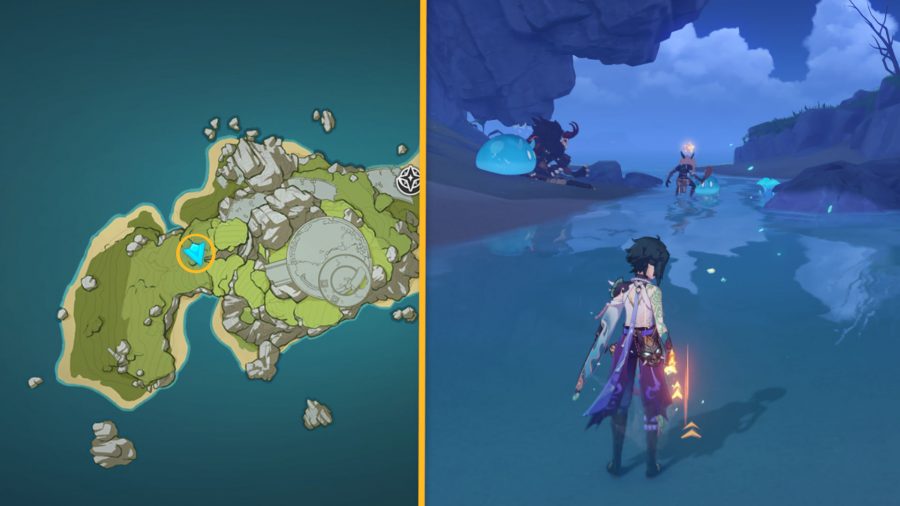
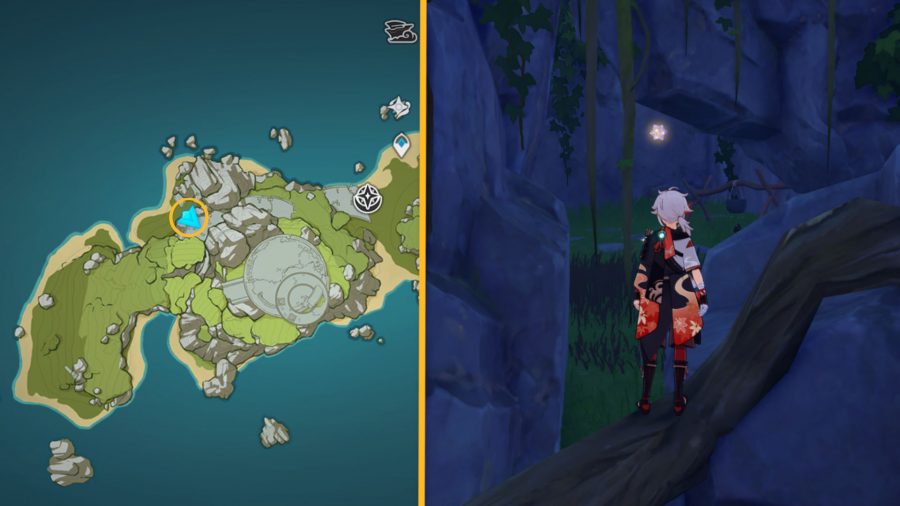
13 – Head to the west side of the base of the island to find a cove. There’s a bunch of baddies guarding a Starlight Coalescence. Beat ‘em up and snag that star
14 – There’s a small hillichurl camp in a cave in the wall to the North-West of the island, just around the corner from where you found the previous Starlight Coalescence. Hop inside and defeat the three Hillichurls, then grab that sucker
Minacious Isle formation 2
Before you head to the second version of Minacious Isle, make sure you’ve enabled the wind currents by activating the anemo totem at the base of the ruins/tower – this makes your life much easier as you traverse the terrain. Then simply hop through one of the ‘place in water’ teleporters.
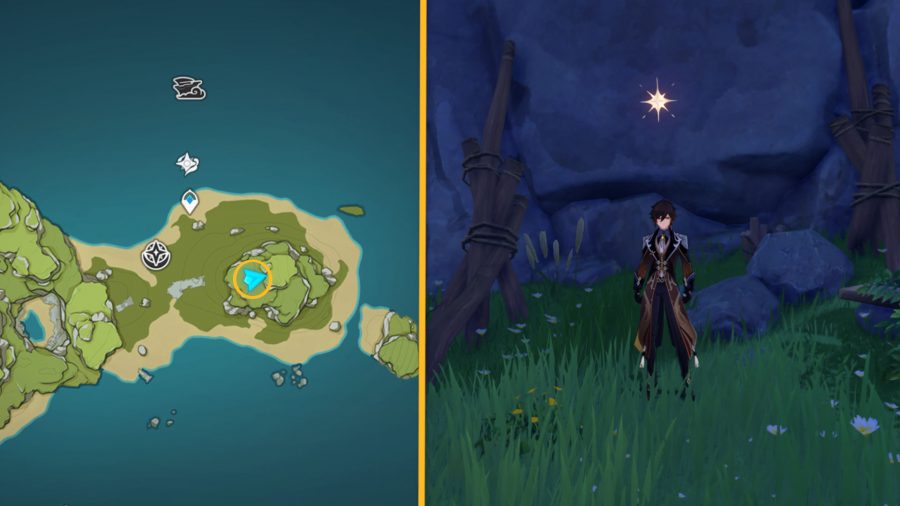
15 – South of the teleporter, there’s a star on the side of the base of the mountain. Walk up to it and hit the ‘touch’ prompt to spawn the Starlight Coalescence. Follow it as it meanders all the way over to the ‘place in water’ teleporter
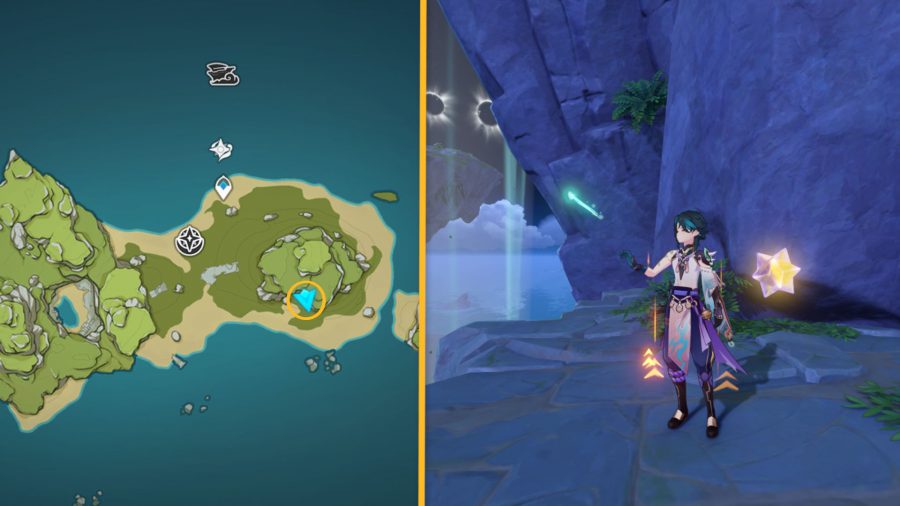
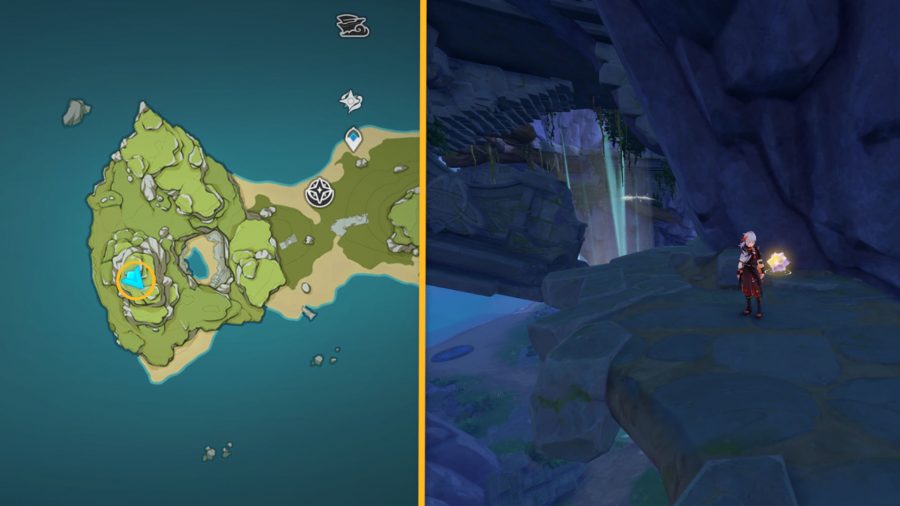
16 – Use the wind currents or climb the mountain to the east of the island. There’s a small ledge to the south of the mountain, just below its peak. Drop down to capture the Starlight Coalescence there
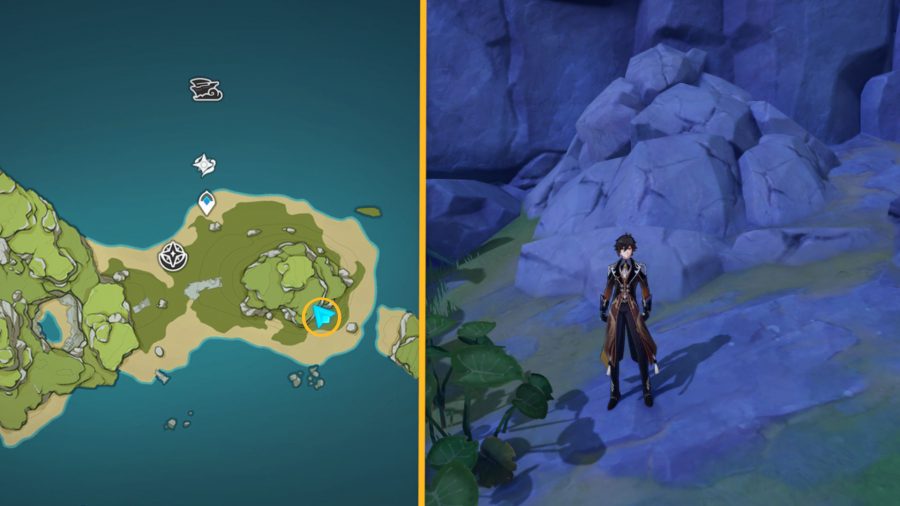
17 – There’s a breakable rock pile at the south-east base of the eastern mountain, near the beach. Smash those rocks to release the Starlight Coalescence, then follow that sucker wherever it decides to take you (up the mountain – because of course, it wants to play hard-to-get)
18 – Ah! The last one! We’re finally there, fellow travelers. This one’s a little tricky to spot, but not tricky to get to. Head to the mountain to the west of the island, then ride the wind current up through the centre (where the tower ruins are on the other formation). Glide to the west, and the final Starlight Coalescence is sitting on a ledge nearby
When you submit eight Starlight Coalescences to the mechanism that forms the Genshin Impact Minacious Isle puzzle, a new astral path forms – along with another Starlight Coalescence. Follow it until it stops, then touch it. It then transports you to a platform high above the island, where you find another luxurious chest, and a pretty light show to boot.
And that’s it – all of the Genshin Impact Starlight Coalescence locations on Minacles Isle. We’ll be sure to let you know if we find out what the rest of these pretty little things are used for. In the meantime, head over to our list of the best games like Genshin Impact to find a fresh adventure to embark on.
